How to flush your water heater like a pro
Quick answer
Follow the model's maintenance schedule for flushing, anode inspection and relief valve checks. Turn off heat or power and allow the water to cool before draining. Stop and call a plumber if the tank is damaged or the drain is blocked.
Follow the water through the tank
Cutaway of a storage water heater. Cold water travels down the dip tube. Sediment collects at the bottom near the drain valve. The gas control shown is one example; electric models have a power disconnect instead.
The heater stays see-through with its parts labeled. Turn or zoom the heater, then choose a part or a step. Use the arrow keys when the drawing is focused.
Still diagram and written explanation
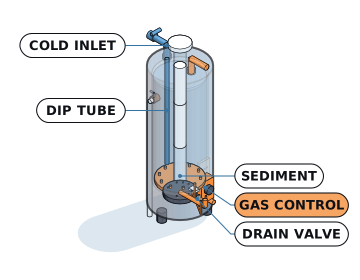
- Gas control
- The control on the outside of the tank regulates gas to the pilot and burner. A loss of the flame signal stops gas flow. Gas work belongs with a qualified technician.
- Cold inlet
- Cold water enters at the top. The inlet shutoff controls the supply to the tank. Do not shut off water or drain until heat or power is off and it is safe to do so.
- Dip tube
- Inside the tank, this tube carries incoming cold water toward the bottom. A damaged tube can mix cold water into the hot water at the top.
- Sediment
- Mineral sediment settles at the bottom of the tank. It can reduce heat transfer and block the drain. Follow the model's maintenance schedule.
- Drain valve
- The low valve provides a route out for cooled water during maintenance. A blocked or leaking drain needs inspection. Do not remove it from a hot or pressurized tank.
- Prepare and cool. Read the model's maintenance instructions first. Turn off electrical power or the gas supply as directed before draining, and allow the water to cool. If the tank is leaking or damaged, call a plumber instead.
- Set up the drain. Once cool, shut the cold water inlet, attach a suitable hose to the drain valve, and secure the other end at a safe drain. Open a hot tap to admit air, following the manufacturer's instructions.
- Drain safely. Open the drain valve carefully. If it will not drain, stop and call a plumber. Do not remove the relief valve, cut its pipe or loosen pressurized connections to clear a blockage.
- Flush, refill, then restart. Flush according to the manual, close the drain valve, and refill the tank. Leave a hot tap open until water flows steadily and the tank is completely full. Only then restore heat or power according to the manual.
Before you touch the heater. Follow your model's manual. Turn off heat or power and let water cool before draining. Stop if the tank is damaged or the drain is blocked. Refill completely before restoring heat or power.
Why flush
Sediment can reduce efficiency and affect the drain valve. Follow the manufacturer's inspection and flushing schedule for your model and water quality.
Maintenance can help identify wear, but it does not guarantee a particular lifespan or prevent every leak. Have a qualified technician assess corrosion, damaged valves or a tank that will not drain.
Step by step
- 1
Read the model's maintenance instructions first. Turn off electrical power or the gas supply as directed before draining, and allow the water to cool. If the tank is leaking or damaged, call a plumber instead.
- 2
Once cool, shut the cold water inlet, attach a suitable hose to the drain valve, and secure the other end at a safe drain. Open a hot tap to admit air, following the manufacturer's instructions.
- 3
Open the drain valve carefully. If it will not drain, stop and call a plumber. Do not remove the relief valve, cut its pipe or loosen pressurized connections to clear a blockage.
- 4
Flush according to the manual, close the drain valve, and refill the tank. Leave a hot tap open until water flows steadily and the tank is completely full. Only then restore heat or power according to the manual.
What sediment looks like
Brandon at Quick Water Heater · 3:38–4:25
What sediment looks like when it comes out of a tank.
Watch on YouTubeRather we did it?
Tank flush: $295, or $245 for plan members. Parts such as a new drain valve cost extra if needed.