")
Water Heater Hose Repair is a crucial task that homeowners may need to undertake at some point. Damaged water heater hoses can lead to issues such as leaks, puddles around the water heater, and decreased hot water supply. To repair a water heater hose, you will need a few tools including an adjustable wrench, Teflon tape, and a replacement hose. The repair process involves turning off the water supply, draining the water heater, removing the damaged hose, installing the new hose, and tightening the connections. It is also important to take preventative measures to avoid water heater hose damage, such as regularly inspecting the hoses for wear, replacing old hoses every few years, and using Teflon tape for a tight seal. If you have any questions about water heater hose repair, refer to the FAQ section for more information on causes of damage, DIY repair possibilities, inspection frequency, safety precautions, and when to consider hose replacement.
Signs of a Damaged Water Heater Hose
Knowing the signs of a damaged water heater hose is crucial in order to address any issues promptly and prevent further damage or potential hazards.
Leaking water from the hose
If you notice leaking water from the hose of your water heater, it is a clear sign of damage. This could indicate a crack or hole in the hose, causing water to escape and potentially lead to further issues. It is important to address this problem promptly to prevent any water damage or disruption to your hot water supply. Follow the step-by-step guide to repairing a water heater hose to fix the issue and ensure the proper functioning of your water heater.
Puddles around the water heater
If you notice puddles around your water heater, it may be a sign of a damaged water heater hose. Puddles can indicate a leak in the hose, which can lead to water damage and potentially costly repairs if not addressed promptly. It is important to take action and repair or replace the damaged hose to prevent further issues and ensure the proper functioning of your water heater.
Decreased hot water supply
If you notice a decreased hot water supply in your home, it could be a sign of a damaged water heater hose. The hot water supply may not be as strong or consistent as it used to be, indicating a potential issue with the hose. This could be caused by a leak or blockage in the hose, preventing hot water from flowing properly. It is important to address this problem promptly to avoid further damage and inconvenience. Follow the necessary steps to repair or replace the water heater hose to restore the hot water supply in your home.
Tools Needed for Water Heater Hose Repair
In order to repair a water heater hose, you will need a few essential tools including an adjustable wrench, Teflon tape, and a replacement hose.
Adjustable wrench
An adjustable wrench is a necessary tool for repairing a water heater hose. This versatile tool allows you to easily tighten or loosen the connections on the hose. When working with the water heater, it is important to use the correct size of wrench to ensure a secure fit. An adjustable wrench can be adjusted to fit different sizes of nuts and bolts, making it a valuable tool for various household repairs. By using an adjustable wrench during the water heater hose repair process, you can ensure that the connections are properly tightened, preventing any leaks or further damage.
Teflon tape
Teflon tape is an essential tool needed for repairing a water heater hose. It is commonly used to create a tight, leak-proof seal between the hose connections. When connecting the new hose to the water heater, wrapping Teflon tape around the threads helps to prevent any water leakage. This thin tape is made of polytetrafluoroethylene (PTFE), which has excellent resistance to high temperatures and chemicals. By using Teflon tape during the repair process, you can ensure a secure connection and avoid any potential water damage or loss of hot water supply.
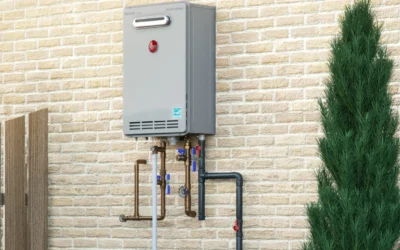
Replacement hose
To repair a water heater hose, one of the essential tools you will need is a replacement hose. When the existing hose is damaged and unable to effectively contain the water, it is necessary to replace it with a new one. The replacement hose should be compatible with your water heater system and of appropriate size. By having a suitable replacement hose on hand, you can easily remove the damaged hose and install the new one, ensuring a proper and secure connection.
Step-by-Step Guide to Repairing a Water Heater Hose
This section provides a step-by-step guide for repairing a water heater hose, including instructions on turning off the water supply, draining the water heater, removing the damaged hose, installing the new hose, and tightening the connections.
Turn off the water supply
To repair a water heater hose, one of the essential steps is to turn off the water supply. This is crucial to ensure that no water is flowing through the hose while you work on it. By turning off the water supply, you minimize the risk of leaks or water damage during the repair process. Make sure to locate the shut-off valve for your water heater and turn it off completely. This step will provide a safe environment for you to proceed with the repair and prevent any further water leakage.
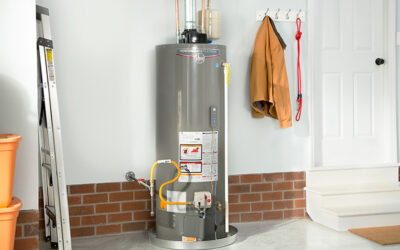
Drain the water heater
To drain the water heater, follow these steps:
1. Turn off the power supply to the water heater. This is important to prevent any accidents or electric shocks while working on the unit.
2. Locate the drain valve at the bottom of the water heater. It is usually a small faucet-like valve.
3. Place a bucket or a large container beneath the drain valve to collect the water that will be released.
4. Slowly open the drain valve by turning it counterclockwise. Be cautious as the water may be hot and under pressure.
5. Allow the water to flow out completely. This may take some time depending on the size of your water heater.
6. Once all the water has drained out, close the drain valve by turning it clockwise.
Draining the water heater helps to remove any sediment or buildup that may have accumulated over time. It is recommended to drain the water heater at least once a year to maintain its efficiency and prolong its lifespan.
Remove the damaged hose
To remove the damaged hose, follow these steps:
- First, make sure to turn off the water supply to the water heater.
- Next, drain the water heater to prevent any water from leaking out when you remove the hose.
- Locate the damaged hose and use an adjustable wrench to loosen the connections at both ends of the hose.
- Gently twist and pull the hose to remove it from the water heater.
By carefully following these steps, you can successfully remove the damaged hose from your water heater.
Install the new hose
To install the new hose, follow these steps:
- Before starting the installation process, make sure you have turned off the water supply and drained the water heater completely.
- Begin by removing the damaged hose carefully. Use an adjustable wrench to loosen the connections and disconnect the old hose from the water heater.
- Take the replacement hose and ensure it is the correct size and type for your water heater.
- Apply Teflon tape to the threads of the connections on both ends of the new hose. This will help create a tight seal and prevent any leaks.
- Insert one end of the new hose onto the water heater’s outlet valve and tighten the connection using the adjustable wrench.
- Next, connect the other end of the hose to the appropriate inlet valve, again using the adjustable wrench to tighten the connection.
- Once both ends are securely attached, double-check that all connections are tight and there are no signs of leakage.
- Finally, turn on the water supply and check for any leaks or issues. If everything looks good, you have successfully installed the new hose for your water heater.
Remember, it is always recommended to refer to the manufacturer’s instructions for specific guidelines on installing a new hose for your particular water heater model.
Tighten the connections
To tighten the connections of a water heater hose, follow these steps:
– First, make sure the water supply is turned off to prevent any leaks or accidents.
– Then, using an adjustable wrench, carefully loosen the connections of the hose. Be cautious not to damage the fittings or the hose itself.
– Once the connections are loose, remove the hose from the water heater.
– Take the new hose and align it with the fittings on the water heater. Make sure the hose is properly positioned and secure.
– Using the adjustable wrench, tighten the connections of the new hose. Ensure that the connections are snug but not overly tightened to avoid any damage.
– Once all the connections are tightened, double-check for any potential leaks or loose fittings.
– Finally, turn on the water supply and test the water heater to ensure it is functioning properly.
By following these steps, you can effectively tighten the connections of a water heater hose, ensuring a secure and leak-free installation.
Tips for Preventing Water Heater Hose Damage
Taking preventive measures can help you avoid water heater hose damage. Regularly inspect your hoses for any signs of wear or damage, and replace old hoses with new ones every few years. Additionally, use Teflon tape when connecting hoses to ensure a tight seal and minimize the risk of leaks.
Regularly inspect the hoses for any signs of wear or damage
Regularly inspecting the hoses for any signs of wear or damage is crucial to maintaining the functionality and efficiency of your water heater. By conducting routine inspections, you can identify any potential issues early on and prevent further damage or leaks. Look for signs such as cracks, holes, or bulges in the hoses, as well as any signs of water leakage or corrosion. If you notice any of these signs, it is important to address them promptly to avoid more extensive damage.
Replace old hoses with new ones every few years
It is important to regularly replace old water heater hoses with new ones every few years. Over time, hoses can deteriorate and become more prone to leaks and damage. By replacing them periodically, you can ensure that your water heater operates efficiently and without any issues. This simple maintenance step can help prevent potential water damage and costly repairs in the future.
Use Teflon tape when connecting hoses to ensure a tight seal
When connecting hoses to ensure a tight seal, it is important to use Teflon tape. Teflon tape, also known as plumber’s tape or thread seal tape, is a thin, white tape that is wrapped around the threaded ends of pipes and fittings before they are connected. This tape helps create a watertight seal and prevents leaks. To use Teflon tape, simply wrap it clockwise around the male threads of the hose connection, overlapping the tape slightly as you go. It is recommended to wrap the tape around the threads at least three times for a secure seal. Once the tape is applied, tighten the connection with an adjustable wrench to ensure a snug fit. Using Teflon tape is a simple yet effective way to prevent water leaks and ensure the proper functioning of your water heater hose.
FAQ
FAQ: In this section, we will answer common questions about water heater hose repair, such as what causes hose damage, if it is possible to repair the hose on your own, how often hoses should be inspected, safety precautions to take during repairs, and when to consider replacing the hoses.
What causes water heater hoses to get damaged?
Water heater hoses can get damaged due to factors such as age, wear and tear, high water pressure, corrosion, and improper installation.
Can I repair a water heater hose on my own?
Repairing a water heater hose on your own is possible, but it is important to have the necessary tools and knowledge to do so safely and effectively.
How often should I inspect my water heater hoses?
It is important to regularly inspect your water heater hoses to ensure they are in good condition and to prevent any potential damage or leaks.
Are there any safety precautions I should take while repairing a water heater hose?
When repairing a water heater hose, it is important to take certain safety precautions to avoid any accidents or injuries.