")
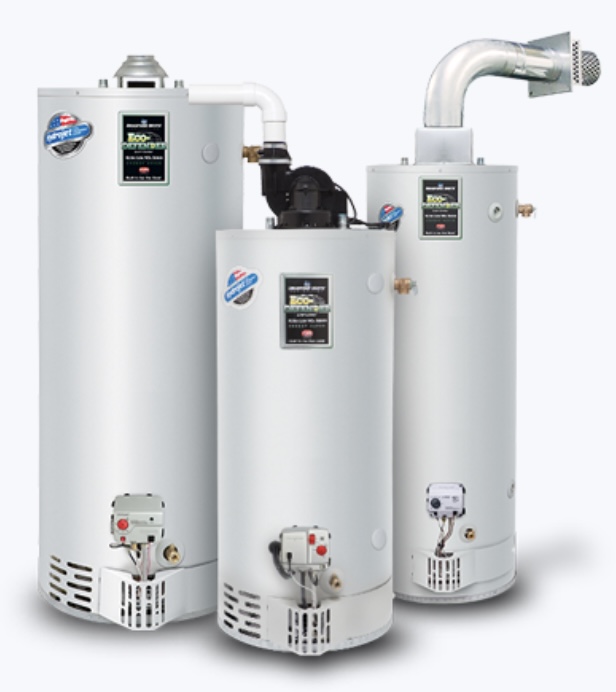
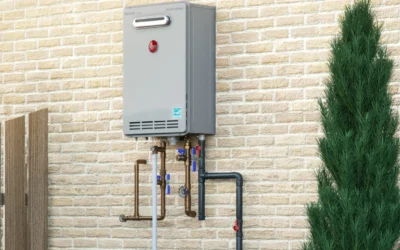
Furnace hot water heater repair involves addressing common issues that may arise with the system. Some of these issues include a pilot light not igniting, inadequate heating, strange noises, and leaking water. To tackle these problems, steps can be taken such as checking the pilot light, inspecting and cleaning the burner, replacing faulty thermocouples, and fixing leaks or damaged parts. By following these steps, the furnace hot water heater can be repaired effectively.
Common Issues with Furnace Hot Water Heater
When it comes to furnace hot water heaters, there are several common issues that homeowners may encounter. These issues include pilot light not igniting, inadequate heating, strange noises, and leaking water.
1. Pilot Light Not Igniting
If your furnace hot water heater’s pilot light is not igniting, there are a few potential causes for this issue. First, check if there is a gas supply issue by ensuring that the gas valve is turned on. If it is on, but the pilot light still won’t ignite, there may be a problem with the thermocouple. The thermocouple is a safety device that senses the pilot flame and allows gas to flow to the burner. Over time, the thermocouple can become dirty or damaged, preventing it from functioning properly. In this case, you may need to replace the faulty thermocouple to resolve the issue. It’s also worth checking if the pilot light orifice is clogged with debris, as this can prevent the pilot light from igniting. If you are unsure about how to handle these repairs, it is recommended to consult a professional technician for assistance.
2. Inadequate Heating
One common issue with a furnace hot water heater is inadequate heating. When the heater is not providing enough heat, it can be quite frustrating, especially during colder months. There are several potential reasons for inadequate heating, including a malfunctioning thermostat, a clogged filter, or a faulty heating element. To address this issue, it is important to first check the thermostat settings and ensure they are properly adjusted. If the settings are correct, then the filter should be inspected and cleaned or replaced if necessary. If these steps do not resolve the problem, it may be necessary to call a professional to inspect and repair the heating element.
3. Strange Noises
Strange noises coming from your furnace hot water heater can be a cause for concern. These noises can indicate various issues that need to be addressed to ensure proper functioning of your water heater. One possible cause of strange noises is sediment buildup in the tank, which can lead to popping or rumbling sounds. Another potential cause is a faulty heating element or a loose component, resulting in rattling or buzzing noises. It is important to promptly address these strange noises to prevent further damage and ensure the longevity of your furnace hot water heater.
4. Leaking Water
If your furnace hot water heater is experiencing leaking water, it is crucial to address the issue promptly to avoid further damage. Leaking water can be a sign of various underlying problems, such as a faulty valve, damaged pipes, or a worn-out gasket. To repair the leaking water, you should start by shutting off the water supply and draining the tank. Next, inspect the valves and connections for any signs of damage or loose fittings. If you identify any faulty components, such as a worn-out gasket or damaged pipes, they should be replaced. Additionally, ensure that all connections are tightened securely to prevent future leaks. Once the necessary repairs are complete, you can refill the tank and test for any remaining leaks. Taking swift action to address a leaking water issue will help maintain the efficiency and functionality of your furnace hot water heater.
Steps to Repair Furnace Hot Water Heater
Steps to repair a furnace hot water heater:
- Step 1: Check the pilot light to ensure it is igniting properly.
- Step 2: Inspect and clean the burner to improve heating efficiency.
- Step 3: Replace a faulty thermocouple if the pilot light continues to go out.
- Step 4: Fix any leaks and replace damaged parts to prevent further issues.
1. Check the Pilot Light
When troubleshooting furnace hot water heater issues, one of the first steps is to check the pilot light. A pilot light that is not igniting could be due to a variety of reasons, such as a gas supply issue, a dirty or clogged pilot light orifice, or a faulty thermocouple. To check the pilot light, ensure that the gas supply valve is open and the thermostat is set to the appropriate temperature. If the pilot light is not lit, follow the manufacturer’s instructions to relight it. If the pilot light continues to go out or does not stay lit, it may indicate a more significant problem that requires professional repair.
2. Inspect and Clean the Burner
Inspecting and cleaning the burner is an essential step in repairing a furnace hot water heater. To begin, ensure the power to the heater is turned off for safety. Then, carefully remove the burner assembly, taking note of the various components and their positions. Inspect the burner for any signs of dirt, debris, or corrosion, which may impede its performance. Use a soft brush or cloth to clean the burner thoroughly, ensuring all blockages are removed. Pay attention to the burner ports and ensure they are clear and free from any obstructions. Once cleaned, reassemble the burner and securely fasten it back into place. Turn the power back on and test the furnace hot water heater to confirm if the issue has been resolved.
3. Replace Faulty Thermocouple
To replace a faulty thermocouple in your furnace hot water heater, follow these steps:
- Turn off the gas supply to the water heater.
- Locate the thermocouple, which is a small copper tube connected to the gas valve.
- Disconnect the thermocouple from the gas valve using an adjustable wrench.
- Remove any mounting brackets or clamps holding the thermocouple in place.
- Take note of the position of the thermocouple and carefully remove it from the pilot assembly.
- Take the faulty thermocouple to a hardware store to find an exact replacement.
- Install the new thermocouple into the pilot assembly, ensuring it is properly aligned.
- Tighten all connections using an adjustable wrench, but be careful not to overtighten.
- Reattach any mounting brackets or clamps to secure the thermocouple in place.
- Turn on the gas supply and test the pilot light ignition.
By following these steps, you can successfully replace a faulty thermocouple in your furnace hot water heater.
4. Fix Leaks and Replace Damaged Parts
To fix leaks and replace damaged parts in your furnace hot water heater, there are a few steps you can follow. First, identify the source of the leak and determine which parts need to be replaced. Once you have identified the damaged parts, turn off the power supply to the water heater. Then, drain the water from the system to prevent any further damage. Next, remove the faulty components and replace them with new ones. Ensure that all connections are secure and tight. Finally, refill the water heater and test for any leaks. If there are no leaks and the water heater is functioning properly, you have successfully fixed the leaks and replaced the damaged parts.
Hot Water Boiler Heater Repair
If you are experiencing issues with your hot water boiler heater, it is important to address them promptly to ensure a consistent supply of hot water in your home. Common issues with hot water boiler heaters include a lack of heat or insufficient heat, leaking boilers, abnormal boiler pressure, and strange noises coming from the boiler. To repair your hot water boiler heater, there are several steps you can take. These include bleeding air from the system, checking and adjusting water pressure, replacing faulty valves and components, and repairing any leaks and insulating pipes. By following these steps, you can restore your hot water boiler heater to optimal functioning and enjoy a reliable supply of hot water for your showers and household needs.
Common Issues with Hot Water Boiler Heater
There are several common issues that can arise with a hot water boiler heater, including no heat or insufficient heat, a leaking boiler, abnormal boiler pressure, and strange noises coming from the boiler.
1. No Heat or Insufficient Heat
If you are experiencing no heat or insufficient heat from your hot water boiler heater, there could be several possible causes. One common issue is a malfunctioning thermostat that is not properly regulating the temperature. Another possibility is a clogged or blocked pipe that is preventing the hot water from flowing properly. Additionally, a faulty heating element or a malfunctioning burner could also be to blame for the lack of heat. It is important to troubleshoot these potential issues and address them accordingly in order to restore proper heating to your hot water boiler heater.
2. Leaking Boiler
Leaking boilers can be a common issue that homeowners may encounter with their hot water boiler heaters. This problem can lead to water damage and potential safety hazards if not addressed promptly. To repair a leaking boiler, there are several steps that can be taken. Firstly, it is important to identify the source of the leak by inspecting all visible pipes, valves, and fittings for any signs of water leakage. Once the source is identified, the damaged component should be replaced or repaired accordingly. It is also essential to check the boiler’s pressure and ensure it is within the recommended range, as excessive pressure can contribute to leaks. Additionally, insulating pipes and valves can help prevent future leaks by protecting them from extreme temperatures. Overall, addressing a leaking boiler promptly and following the necessary repair steps can help restore the functionality and safety of the hot water boiler heater system.
3. Abnormal Boiler Pressure
Abnormal boiler pressure is a common issue that homeowners may encounter with their hot water boiler heater. This can be a cause for concern as it may indicate a problem with the boiler’s pressure regulating system. When the boiler pressure is too high, it can put unnecessary strain on the system and potentially lead to leaks or other damages. On the other hand, if the pressure is too low, it can result in inadequate heating and reduced efficiency. To address this issue, it is important to check and adjust the boiler’s pressure settings according to the manufacturer’s guidelines. This may involve using a pressure gauge to monitor the pressure levels and making necessary adjustments to ensure it remains within the recommended range. If the problem persists, it is advisable to consult a professional technician for further inspection and repair.
4. Boiler Making Strange Noises
If your hot water boiler is making strange noises, it could be an indication of a problem that needs to be addressed. Strange noises coming from the boiler can range from banging, clanking, or gurgling sounds. These noises can be caused by various issues such as air trapped in the system, a faulty pump, or mineral buildup in the pipes. To resolve this problem, it is important to diagnose the specific cause of the noise. In some cases, bleeding the air from the system or adjusting the water pressure may solve the issue. However, if the noise persists, it may be necessary to replace faulty valves or components and ensure that the pipes are properly insulated. Taking prompt action to address the strange noises can help prevent further damage to your hot water boiler heater.
Steps to Repair Hot Water Boiler Heater
When it comes to repairing a hot water boiler heater, there are several steps that can be taken to address common issues and ensure optimal performance. These steps include:
- Step 1: Bleed air from the system to improve heating efficiency and prevent airlocks.
- Step 2: Check and adjust the water pressure to ensure it is within the recommended range for the boiler.
- Step 3: Replace faulty valves and components that may be causing issues with heat distribution or water flow.
- Step 4: Repair any leaks in the system and insulate pipes to prevent heat loss and improve energy efficiency.
By following these steps, homeowners can effectively address common issues with their hot water boiler heater and restore its functionality and performance.
1. Bleed Air from the System
One crucial step in repairing a hot water boiler heater is to bleed air from the system. When air gets trapped in the system, it can cause issues such as reduced heating efficiency and noisy operation. To bleed air, locate the bleed valve on the boiler or the radiators. Place a container underneath the valve to catch any water that may be released. Use a key or a screwdriver to slowly open the valve, allowing the air to escape. Close the valve once water starts flowing steadily. This process helps ensure optimal heating performance and prevents further problems in the hot water boiler heater.
2. Check and Adjust Water Pressure
To check and adjust water pressure, follow these steps:
1. Turn off the hot water boiler heater and wait for it to cool down.
2. Locate the pressure gauge on the boiler. It is usually located on the front or side of the unit.
3. Check the current pressure reading on the gauge. The optimal pressure range for most hot water boiler heaters is typically between 12 and 15 psi (pounds per square inch).
4. If the pressure reading is below the recommended range, you will need to increase the water pressure. To do this, locate the fill valve on the boiler and slowly open it. Monitor the pressure gauge as you do this and stop when the pressure reaches the desired range.
5. If the pressure reading is above the recommended range, you will need to decrease the water pressure. To do this, locate the pressure relief valve on the boiler and slowly open it. Allow some water to escape until the pressure drops to the desired range.
6. Once you have adjusted the water pressure to the appropriate range, close the fill valve or pressure relief valve.
7. Turn on the hot water boiler heater and check if the water pressure remains within the recommended range. If not, repeat the adjustment process until the desired pressure is achieved and maintained.
Remember, proper water pressure is crucial for the efficient and safe operation of your hot water boiler heater.
3. Replace Faulty Valves and Components
To repair a hot water boiler heater, one important step is to replace faulty valves and components. Faulty valves and components can cause issues such as insufficient heat or abnormal boiler pressure. By replacing these faulty parts, the boiler can function properly and provide consistent heat. It is important to carefully inspect the valves and components to identify any signs of damage or wear. Once identified, they should be replaced with new, reliable parts to ensure the efficiency and safety of the hot water boiler heater system.
4. Repair Leaks and Insulate Pipes
To repair leaks and insulate pipes, there are several important steps to follow. First, identify the source of the leaks by checking all the connections and joints in the plumbing system. Once the leaks are located, use appropriate tools such as pipe wrenches or plumber’s tape to fix them securely. Next, insulate the pipes to prevent heat loss and minimize the risk of freezing during colder months. This can be done by wrapping the pipes with foam insulation sleeves or using heat tape. Insulating the pipes not only helps to conserve energy but also protects them from potential damage caused by extreme temperatures. Make sure to carefully follow the manufacturer’s instructions while performing these repair and insulation tasks to ensure a successful outcome.
Shower Water Heater Repair
When it comes to shower water heater repair, there are several common issues that homeowners may encounter. These include a lack of hot water, fluctuating water temperature, low water pressure, and leaking shower water heater. To address these problems, there are steps that can be taken to troubleshoot and repair the shower water heater. These steps may involve checking the thermostat settings, flushing and cleaning the water heater tank, and potentially replacing faulty components. By following these repair steps, homeowners can ensure that their shower water heater is functioning properly and providing a consistent and comfortable shower experience.
Common Issues with Shower Water Heater
When it comes to shower water heaters, there are several common issues that homeowners may encounter. These can include a lack of hot water, fluctuating water temperature, low water pressure, and leaking shower water heaters. It is important to address these issues promptly to ensure a comfortable and enjoyable shower experience.
2. Fluctuating Water Temperature
One common issue with a shower water heater is fluctuating water temperature. This can be frustrating and uncomfortable, as the temperature may suddenly change from hot to cold or vice versa. Fluctuating water temperature can occur due to various reasons, such as a faulty thermostat or a malfunctioning heating element. To address this issue, it is important to check the thermostat settings and ensure they are properly calibrated. Additionally, flushing and cleaning the water heater tank can help remove any sediment or mineral buildup that could be affecting the temperature consistency. Regular maintenance and inspection of the shower water heater can help prevent and resolve this issue.
3. Low Water Pressure
One common issue with a shower water heater is low water pressure. Low water pressure can be frustrating as it can make it difficult to enjoy a satisfying shower. There are a few possible causes for low water pressure in a shower water heater. It could be due to a clogged showerhead or a problem with the water supply line. Another possible cause could be a faulty pressure regulator or a water heater that is too small for the demand. To address low water pressure in a shower water heater, it is important to first identify the underlying cause. Once the cause is determined, appropriate steps can be taken to resolve the issue and restore proper water pressure.
4. Leaking Shower Water Heater
If you notice that your shower water heater is leaking, it is important to address the issue promptly to prevent further damage. Leaks in the water heater can lead to water damage and potential safety hazards. To repair a leaking shower water heater, follow these steps:
- 1. Turn off the power supply to the water heater.
- 2. Shut off the water supply to the heater by closing the valve.
- 3. Drain the water from the heater to relieve pressure.
- 4. Identify the source of the leak, which could be from a faulty valve, a damaged pipe, or a leaking tank.
- 5. Replace any faulty valves or damaged pipes.
- 6. If the tank is leaking, it may need to be replaced entirely.
- 7. Once the necessary repairs or replacements are made, refill the tank and check for any additional leaks.
- 8. Turn the power supply back on and test the shower water heater to ensure it is functioning properly.
Steps to Repair Shower Water Heater
When repairing a shower water heater, there are a few important steps to follow:
- Step 1: Check the thermostat settings to ensure they are correctly adjusted for the desired water temperature.
- Step 2: Flush and clean the water heater tank to remove any sediment or debris that may be affecting its performance.
1. Check the Thermostat Settings
To repair a shower water heater, one of the steps is to check the thermostat settings. This is important because incorrect thermostat settings can lead to issues such as no hot water or fluctuating water temperature. By verifying and adjusting the thermostat settings, it ensures that the water heater is set at the desired temperature, providing a consistent and comfortable shower experience. Checking the thermostat settings is a simple yet crucial step in the repair process of a shower water heater.
2. Flush and Clean the Water Heater Tank
To flush and clean the water heater tank, follow these steps:
- Turn off the power supply to the water heater.
- Close the cold water supply valve to the tank.
- Attach a hose to the drain valve at the bottom of the tank.
- Place the other end of the hose in a suitable drainage area or connect it to a drain.
- Open the drain valve and allow the water to flow out of the tank.
- Once the tank is empty, open the cold water supply valve to flush out any remaining sediment or debris.
- Let the water flow through the tank and out of the drain valve for a few minutes.
- Close the drain valve and remove the hose.
- Turn on the cold water supply valve to refill the tank.
- Check for any leaks around the tank and ensure that the water heater is functioning properly.
Flushing and cleaning the water heater tank regularly helps to remove sediment buildup, improve efficiency, and extend the lifespan of the water heater.
3. Replace Faulty Heating Elements
When dealing with a malfunctioning hot water heater, one possible issue could be faulty heating elements. If the heating elements are not functioning properly, it can result in inadequate heating or no hot water at all. To address this problem, the faulty heating elements need to be replaced. This can be done by first turning off the power to the water heater and draining the tank. Then, the old heating elements can be removed and replaced with new ones. Once the new heating elements are installed, the tank can be refilled with water and the power can be turned back on. This should resolve the issue and restore the proper functioning of the hot water heater.
4. Repair or Replace Leaking Parts
If you are experiencing a leaking water heater, it is crucial to repair or replace the leaking parts as soon as possible. Leaks can lead to water damage and potentially cause further issues with your water heater. To fix the problem, start by shutting off the power and water supply to the heater. Next, locate the source of the leak and determine if it is a repairable issue or if any parts need to be replaced. In some cases, a simple repair such as tightening a loose connection or replacing a faulty valve may solve the problem. However, if the leak persists or if there is extensive damage to the heater, it may be necessary to replace the leaking parts entirely. Always consult a professional if you are unsure or uncomfortable performing these repairs yourself.
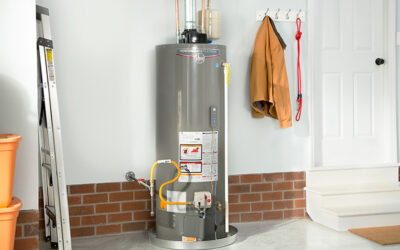
Water Heater Repair Tank
When it comes to water heater repair, one common issue that homeowners may encounter is a malfunctioning tank. The tank is an essential component of a water heater, as it stores and heats the water. If the tank is not functioning properly, it can result in various problems, such as insufficient heating, leaking, or even a complete lack of hot water. To address these issues, it is important to inspect and assess the condition of the tank, identify any leaks or damages, and take appropriate steps to repair or replace the tank as needed. By ensuring the proper functioning of the water heater tank, homeowners can enjoy consistent and reliable hot water supply in their homes.
Common Issues with Water Heater Tank
When it comes to water heater tanks, there are several common issues that homeowners may encounter. These issues can range from a lack of hot water to leaking tanks and fluctuating water temperatures. It is important to address these problems promptly to ensure the efficient functioning of the water heater and to prevent any further damage.
1. No Hot Water
If you are experiencing the issue of no hot water in your shower water heater, there are a few potential causes to consider. First, check if the thermostat settings are correct and adjust them if necessary. If the settings are not the problem, it may be necessary to flush and clean the water heater tank to remove any sediment or buildup that could be hindering the heating process. By following these steps, you can troubleshoot and address the issue of no hot water in your shower water heater.
2. Leaking Tank
If you are experiencing a leaking tank in your water heater, it is important to address this issue promptly to prevent further damage. Leaks can occur due to various reasons, such as a faulty valve, corroded pipes, or a damaged tank. To repair a leaking tank, follow these steps:
- 1. Turn off the power and water supply to the water heater.
- 2. Drain the tank by attaching a hose to the drain valve and directing it to a suitable location.
- 3. Inspect the tank for any visible cracks or holes. If found, consider replacing the tank.
- 4. Check the valves and connections for leaks. Tighten or replace any faulty components.
- 5. If the tank itself is not leaking, but there is water pooling around the unit, check for leaks in the surrounding pipes.
- 6. Repair or replace any damaged or corroded pipes.
- 7. Once all repairs are completed, close the drain valve and refill the tank with water.
- 8. Turn on the power and water supply to the water heater and check for any new leaks.
By following these steps, you can effectively repair a leaking tank in your water heater and ensure its proper functioning.
3. Rusty Water
If you notice rusty water coming from your shower water heater, it could be a sign of corrosion or rust within the tank or pipes. This issue can occur due to aging equipment or a buildup of sediment in the tank. To address this problem, it is recommended to flush and clean the water heater tank. Start by turning off the power supply and water to the heater. Connect a hose to the drain valve at the bottom of the tank and place the other end in a suitable drain or outside. Open the drain valve and allow the water to flow out until it runs clear. This will help remove any sediment or rust buildup. Once the tank is empty, close the drain valve and refill the tank with fresh water. Finally, turn on the power supply and water to the heater to resume normal operation.
To fix leaks and replace damaged parts in a furnace hot water heater, follow these steps:
- 1. Check the Pilot Light: Ensure that the pilot light is ignited. If not, relight it following the manufacturer’s instructions.
- 2. Inspect and Clean the Burner: Remove any debris or dirt that may be blocking the burner. Use a soft brush or cloth to clean it thoroughly.
- 3. Replace Faulty Thermocouple: If the pilot light still won’t stay lit, the thermocouple may be faulty. Disconnect the old thermocouple and install a new one.
- 4. Fix Leaks and Replace Damaged Parts: Inspect the water heater for any leaks or damaged components. Repair or replace them as necessary to prevent further issues.
By following these steps, you can effectively address leaks and damaged parts in a furnace hot water heater.